Recognizing Failure Symptoms
Insufficient Heat Output During Operation
When a vented dryer runs for sixty minutes and still delivers damp laundry, something within the airflow system is failing. Weak heat output ranks among the most common reasons homeowners seek vented tumble dryer repair, yet in my experience the cause is often straightforward.
The heating element might be burned out, but a blocked exhaust path produces identical symptoms. Thermal overload triggers the safety thermostat when lint restricts ventilation. Watch for these clues:
- The drum rotates but the air feels barely warm
- Cycles finish earlier than the fabric care labels suggest
- Condensation forms on the surrounding walls
Recognising these failure symptoms early prevents secondary damage to the heater assembly. Ignoring them turns a simple fix into a costly replacement of multiple components!
Drum Motion Interruptions or Complete Stoppage
One UK repair firm reported that drum stoppage accounts for nearly twenty percent of all callouts for vented tumble dryer repair, yet the motor is rarely the culprit. The drum can seize for several reasons, and each presents different clues. A worn drive belt produces a thumping sound before the drum halts entirely. A seized bearing locks the drum solid, even when you turn it by hand.
Pay attention to how the machine behaves in the minutes before it stops:
- The drum hesitates when starting, then spins with a scraping noise
- The dryer stops and restarts unpredictably, often with a warm electrical smell
- The drum rotates freely when empty but stalls under a full load
These interruption patterns point to specific components, such as the start capacitor or the idler pulley, and they help a technician prepare the right parts before visiting. Noting the exact behaviour saves time and avoids repeat visits.
Unexplained Grinding or Squealing Sound
A dryer that suddenly starts grinding or squealing is not being dramatic, it is giving you a warning. Those sounds often point to a failing drum bearing or a worn idler pulley. Left alone, the noise gets louder and the component can seize completely. When that happens, your vented tumble dryer repair visit becomes more costly than necessary.
Listen closely to when the sound appears. A grinding noise that builds during the spin cycle usually means metal on metal contact. A high pitched squeal at startup often indicates a slipping belt or a pulley that needs lubrication. These are distinct clues, not random noise.
Common sound sources include:
– The drum support rollers, which wear down over time
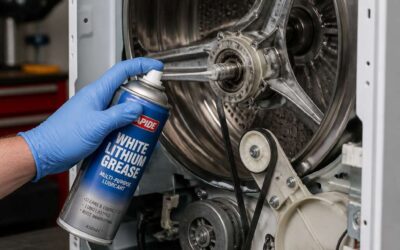
– The idler pulley, which keeps tension on the drive belt
– The motor bearing, which can grind when dry
A technician who hears the sound can often identify the faulty part before opening the machine. That saves labour time and avoids a second visit. Addressing the noise early means your vented tumble dryer repair remains a simple parts swap, not a full replacement. The longer you wait, the more damage that sound does to the drum axle and surrounding brackets. So trust your ears on this one.
Cycles That Extend Well Beyond Normal Duration
A dryer that takes two hours to finish a single load is not being stubborn, it is signalling a breakdown in efficiency. When the cycle duration stretches beyond the norm, the machine is struggling to maintain the correct temperature or airflow, which directly impacts drying time. This is a common problem in UK households and a primary reason for seeking professional vented tumble dryer repair.
Several components can cause this prolonged cycle. In my experience, the most frequent culprits include:
– A clogged lint filter or vent hose, which restricts airflow and forces the heater to work harder.
– A faulty thermostat that fails to register the correct temperature, leaving the dryer running longer.
– A failing heating element that produces only partial heat.
Each of these issues demands a different fix. A professional can diagnose the exact cause and complete the necessary vented tumble dryer repair. Ignoring the prolonged cycle will increase energy bills and strain the motor further.
Noticeable Burning Odor in the Laundry Area
A burning smell in the laundry area is the most alarming symptom a dryer can present. That acrid, electrical scent often means dust accumulation around the heating element, though it can also point to a failing motor bearing or a worn belt rubbing against metal. I have attended callouts where the odour was barely noticeable, and others where it filled the entire kitchen.
A professional vented tumble dryer repair assessment identifies the source before it escalates. Common causes I find include:
- Lint trapped between the drum and the heater housing
- A shorted electrical connection producing a sharp, metallic smell
- Melted debris on the heating coil
Each requires a different approach, and misdiagnosis can lead to further damage.
Preparation and Safety Fundamentals
Disconnecting the Appliance from Mains Power
Before you so much as remove a single screw, you need to make the machine electrically inert. In the UK, a vented tumble dryer repair often begins with a trip to the fuse box, not a multimeter. Shutting off the circuit breaker that feeds the laundry room is the first move, but it is not the only one.
Follow this sequence to guarantee an isolated appliance:
- Switch off the breaker at the consumer unit.
- Unplug the dryer from the wall socket.
- Extract the plug and secure it away from the unit.
Once isolated, give the internal capacitors a few minutes to discharge. This is particularly crucial if your dryer has been running recently. A residual charge can deliver a nasty shock even with the unit unplugged.
Gathering Screwdrivers, Multimeters, and Replacement Parts
Preparation determines whether a vented tumble dryer repair ends with a working machine or a second callout. I always assemble my kit before touching a single fastener. A multimeter is non-negotiable; it verifies continuity across heating elements and thermostats before you spend money on new parts. Magnetic-tipped screwdrivers save your sanity when dealing with dropped fixings. My standard setup includes:
– Insulated screwdrivers in Phillips and flathead profiles
– A multimeter with resistance and continuity settings
– Replacement parts specific to your model
When you begin a vented tumble dryer repair, match every component to the manufacturer’s part number. Refitting a vaguely similar thermostat risks premature failure or a fire hazard. Photograph the wiring layout before disconnecting anything. That habit prevents hours of confusion during reassembly.
Ensuring Proper Ventilation and Workspace Clearance
The majority of vented tumble dryer repair callouts are preventable with basic foresight. In fact, a significant portion of appliance faults stem from environmental factors, not mechanical failures. Before you even open your toolbox, consider the space you are working in. A cramped laundry room with poor airflow turns a simple fix into a frustrating struggle with your own elbows.
Workspace clearance is the first defence against secondary damage. You need a radius of at least a metre around the machine to safely manoeuvre the chassis and access internal components. I have seen technicians strip screws or damage the cabinet because they were forced to work sideways in a tight corridor. A clear floor also prevents you from kicking the appliance’s own disconnected hoses or knocking over your organised array of fixings. When you prepare the environment for a vented tumble dryer repair, you are effectively de-risking the entire operation.
– Ensure the appliance is pulled away from the wall to access the rear venting duct.
– Lay down a protective sheet to catch dust and debris that will inevitably fall from the filter area.
– Clear the surrounding floor of laundry baskets, detergent bottles, and other obstructions that impede movement.
Beyond the physical space, consider the lighting and your line of sight. A headlamp is superior to a work light because it frees your hands and directs illumination exactly where your eyes are looking. Also, check that the power cord reaches the socket without stretching. If you must use an extension lead, ensure it is a heavy-duty drum rated for the appliance’s amperage. Proper preparation turns a risky intervention into a systematic procedure, keeping you safe and the machine intact throughout the vented tumble dryer repair process.
Examining the Lint Trap and External Venting Duct First
Most vented tumble dryer repair work begins not with a screwdriver, but with a flashlight aimed at the lint trap. The external venting duct fails quietly. A clogged duct causes overheating and fire risk, and takes five minutes to rule out.
Check the lint filter for tears or warped edges. Any gap lets fluff bypass the trap into the blower housing. Place your hand near the exterior vent outlet and feel for a strong airflow. A faint breath means the duct is restricted.
- Remove the lint filter and examine it against a bright light.
- Disconnect the duct from the dryer rear.
- Probe the duct with a vent brush or rod.
This simple assessment prevents unnecessary part replacement and turns a vented tumble dryer repair into a routine clearance. The rest of the machine rarely needs attention when the air path is clear.
Step-by-Step Problem Isolation
Testing the Thermal Fuse for Continuity
A single component halts thousands of dryers every year: the thermal fuse. It sits inside the blower housing, a small white rectangle with two spade terminals, and once it trips from excessive heat, there is no resetting it. Effective vented tumble dryer repair depends on verifying continuity through this fuse.
Set your multimeter to the resistance or continuity mode. Touch one probe to each terminal:
- A reading near zero ohms means the fuse is intact.
- A blank display or no audible beep confirms the fuse has blown.
- Record the temperature rating printed on the fuse body before sourcing a replacement.
Removing the rear panel or front kickplate exposes the fuse. You will often find it tucked behind the blower wheel, and it is surprisingly easy to miss. Check for discolouration or a snapped internal wire. If the multimeter reads open, the vented tumble dryer repair hinges on replacing that single component.
Evaluating the Heating Element for Breaks or Shorts
Most heating elements fail without warning. I have opened dryer cabinets where the element looked pristine, yet the machine produced only lukewarm air. To check for breaks, disconnect the element leads and measure resistance across the two terminals. A reading between 10 and 20 ohms indicates a healthy circuit. An open loop means the nichrome wire has fractured internally.
For shorts, place one probe on a terminal and the other on the metal casing. Any continuity here signals a dangerous earth fault. This step demands patience, as the element sits deep inside the housing. Replacing it remains a straightforward task for anyone comfortable with basic vented tumble dryer repair. Always match the wattage rating exactly.
Checking the Rotary Switch and Timer Mechanism
A dryer that hums but never leaves the same dial position hides its fault inside the rotary switch. Most vented tumble dryer repair guides skip the motor, yet this component deserves attention first. It routes power through the cycle, and worn contacts can make the machine skip stages or stall.
Begin with the appliance unplugged and the control panel removed. Photograph the wiring first, since every terminal looks identical. Set your multimeter to continuity and sweep the dial through each position. I find a healthy switch clicks crisply; a tired one feels spongy.
Signatures to check:
- Heating that cuts in and out with the dial angle
- A cycle that advances only when you nudge the knob
- Blackened contacts or a burning odour near the timer
Replacing the timer is a satisfying vented tumble dryer repair task. Match the part number exactly and slot the new unit home.
Measuring Capacitor and Motor Winding Resistance
The humble start capacitor causes more silent failures than any bearing. After the timer passes inspection, the fault often hides here. The capacitor gives the motor its initial kick, and when it degrades, the drum stays still while the machine groans. I always isolate it first, because a charged unit can shock you with the dryer unplugged.
Bridge the terminals with an insulated screwdriver to discharge it, then set the multimeter to resistance. Look for a reading that climbs as the capacitor charges. A static zero or open circuit means the component is dead. For the windings, probe between common and run, then common and start. Typical readings vary, but broadly:
- Run winding: 1 to 4 ohms
- Start winding: 3 to 8 ohms
- Common to earth: infinite resistance
Any short to earth condemns the motor. Replacing a capacitor is a cheap vented tumble dryer repair, while a burnt winding means a full motor swap. Compare your readings against the data plate, and the correct vented tumble dryer repair route becomes obvious.
Inspecting Belt Condition and Tension Pulley Movement
Belt failure accounts for more drum stoppages than most owners assume. After the motor tests healthy, I rotate the drum by hand. A loose belt or a stiff pulley reveals itself immediately, often through a grinding sensation.
A proper vented tumble dryer repair depends on inspecting the belt’s full length. Look for frayed edges, cracks, or a glazed surface where the belt contacts the drum. Next, test the tension pulley’s travel. It should pivot smoothly and maintain firm pressure without wobble.
- Rotate the drum slowly and observe the belt tracking
- Press the pulley to evaluate spring tension
- Spin the pulley to check bearing smoothness
If the belt shows wear or the pulley catches, replace both at once. Skipping the pulley during this vented tumble dryer repair invites a second breakdown. The spring often loses strength before any visible damage appears.
Verifying Airflow with the Vent Hose Connected and Disconnected
Most airflow complaints trace back to a simple misunderstanding of where the resistance actually lives. When a vented tumble dryer repair call involves weak drying or a hot cabinet, the first step is isolating whether the blockage sits inside the machine or downstream in the ductwork.
Run the dryer with the vent hose attached. Feel the air at the exterior vent. A strong, steady flow points to the dryer itself. A weak or absent flow means something upstream is the problem. Now disconnect the hose from the dryer and run the same cycle. If airflow improves dramatically, the restriction lives in the hose or wall vent. This two-stage test separates a failing blower from a clogged run and forms the foundation of proper vented tumble dryer repair.
1. Disconnect the hose at the dryer outlet.
2. Run the dryer on a low heat setting.
3. Place a hand near the outlet to gauge airflow.
A good rule: the machine should push air with enough force to flatten a paper towel held two inches away. The goal is always to identify the true cause before replacing parts, since the blower and the vent path each present different repair routes.
Hands-On Corrective Actions
Replacing a Damaged Heating Element Safely
Almost every vented tumble dryer repair that involves weak heat points to the element housing. The old element must be unclipped from its mounting points rather than pulled, as the ceramic insulators crack easily. Transfer the thermal cut-out bracket to the new part to preserve the original sensor alignment.
Use a socket driver, not pliers, on the retaining screws. I have seen chewed heads on these far too often. Torque feels right when the screw stops rotating, and overtightening bends the metal lugs, losing contact pressure.
- Check the replacement wattage against the part number
- Wipe the housing interior with a lint-free cloth
- Route the wire harness away from the element casing
Fit the back panel and run a timed cool-down before any heated setting. That confirms the earth strap is intact and the element beds in correctly. A tidy vented tumble dryer repair ends here, with a quiet cycle and no lingering heat smell.
Installing a New Thermostat or Thermal Cutoff
A dryer that shuts off before clothes are dry often has a failed thermostat. In my years of vented tumble dryer repair, this part is the second most common failure point after the heating element. The thermal cutoff, a one-shot fuse, protects against overheating. When it trips, you must replace it, not reset it.
Begin by disconnecting power and locating the thermostat on the blower housing. Use a multimeter to test for continuity at room temperature. A reading of zero is good; an open loop means replacement. Install the new thermostat with thermal paste for proper heat transfer. Torque the screws gently. Remember to:
- inspect the wiring connectors for corrosion
- ensure the replacement matches the original temperature rating
- route the sensor wire away from the drum
This straightforward part often saves a call to a technician. A little patience here makes vented tumble dryer repair a satisfying DIY task.
Re-seating the Drive Belt and Adjusting Tension
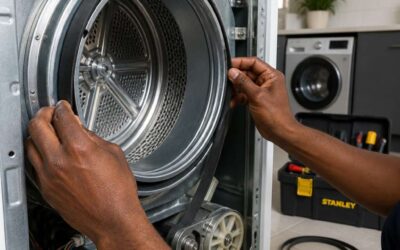
When the drum freezes mid-cycle while the motor keeps humming, a slipped drive belt is often the culprit. In my vented tumble dryer repair experience, reseating the belt and adjusting its tension takes less time than most people think. First, unplug the appliance and tilt it back. You will see the belt wrapped around the drum and the motor pulley. If it has slipped, guide it back into the belt guide and around the pulley. Then inspect the tensioner arm. A correct setting allows about half an inch of play when pressed firmly.
Here is how to adjust the tension properly:
1. Loosen the tensioner bracket bolt slightly.
2. Pull the arm until the belt sits snug but not strained.
3. Retighten the bolt and rotate the drum by hand.
That simple reset prevents grinding noises and erratic drum movement. Knowing this aspect of vented tumble dryer repair saves you a service call.
Cleaning Moisture Sensors and Interior Contacts
Most vented tumble dryer repair guides ignore the moisture sensors, yet these small metallic strips determine cycle length. When fabric softener residue builds up, the sensors misread dampness and extend drying time. Cleaning them takes two minutes.
First, locate the sensors near the lint filter. Use a fine abrasive pad or a damp cloth with rubbing alcohol. Gently rub the strips until they shine. Then inspect the contact wires leading to the control board. Corroded spade connectors cause intermittent readings.
Here is the sequence I follow:
- Unplug the dryer and remove the rear panel.
- Trace the sensor wires to their terminals.
- Disconnect each spade connector and spray with contact cleaner.
- Reattach firmly and test the sensor resistance with a multimeter.
This straightforward maintenance prevents false humidity readings and keeps your machine efficient. Regular cleaning of both sensors and contacts remains a core part of reliable vented tumble dryer repair.
Unblocking the Exhaust Pathway to Restore Proper Drying
A single compacted fluff blockage can add nearly an hour to every drying cycle, yet most owners never inspect the full exhaust run. The pathway from the machine to the outside wall is where airflow dies. I have found crushed hoses and condensation pockets that trap moisture and slow drying dramatically.
The corrective process is straightforward once you accept that the duct is the culprit. This part of vented tumble dryer repair focuses on the extraction side.
- Disconnect the hose at the dryer and at the wall terminal.
- Run a rod with a brush attachment through every section.
- Check the wall flap for free movement and debris.
Reinstall with the shortest, straightest route possible. Bends restrict airflow, and every elbow reduces drying performance. This hands-on step resolves many vented tumble dryer repair calls without touching the machine’s internals. In persistent cases, replace the flexible hose entirely.
Preventive Care and Longevity Strategies
Establishing a Routine Lint Filter Cleaning Schedule
The majority of dryer faults we encounter trace back to a single, overlooked habit. A neglected lint filter slowly strangles your machine’s performance, forcing the heating element to work harder and longer with each cycle. This constant strain accelerates wear on components that would otherwise last for years, turning a simple maintenance task into a costly vented tumble dryer repair. The filter is your first line of defence, not just against fluff, but against premature component failure.
Establishing a fixed routine removes the guesswork. Attach the habit to an existing trigger, such as charging your phone or putting the kettle on in the morning. When the filter is clear, the airflow remains constant, which keeps the internal thermostat readings accurate. This stability prevents the element from overheating and cycling unnecessarily, reducing energy consumption and preserving the integrity of the heating coils.
Empty the lint trap after every single load, without exception.
Wipe the filter mesh with a dry microfibre cloth monthly to remove the invisible film of fabric softener residue.
Inspect the filter for warping or tears every quarter, replacing it if the seal is compromised.
Use a vacuum crevice tool to clear the filter housing slot itself, where lint often accumulates undetected.
In my experience, machines that receive this level of attention rarely require intervention beyond routine maintenance. The internal sensors remain clean, the thermal fuse stays within its operating temperature, and the belt experiences less tension because the drum isn’t fighting against a vacuum. You are essentially protecting the most expensive parts of the appliance with a two second action. This proactive approach is the most effective strategy for avoiding an emergency callout. Neglecting this simple step is often the root cause of overheating, which can warp plastic components and degrade wiring insulation, leading to the very issues that require professional attention.
Inspecting and Rinsing the External Vent Hose Monthly
Many homeowners obsess over the lint trap while forgetting the long plastic duct that carries moist air outside. That external vent hose works hard during every cycle. After months of use, it accumulates a greasy film of fabric softener residue and compacted fluff.
Detach the hose from the rear port monthly. Take it outside and run water through it from both ends. You will see murky discharge, and I find that buildup surprising. That buildup restricts airflow and forces the dryer to run hotter, which increases the likelihood of a vented tumble dryer repair.
- Check for kinks or crushed sections.
- Inspect the foil lining for pinholes.
- Replace if brittle or perforated.
Rinsing alone takes three minutes. It also lets you confirm the exterior wall flap opens fully when the dryer operates. A stuck flap creates positive pressure inside the duct, a condition that often precedes vented tumble dryer repair.
Balancing the Appliance with an Integrated Level
An integrated level costs a few pounds at any hardware shop. It is the cheapest insurance for a machine that otherwise works flawlessly. I have adjusted dryers that sat on crooked floors for years, and the difference in noise alone was startling.
A slight tilt forces the drum to press harder on its support wheels. That pressure generates friction, extra heat, and premature wear on the motor bearings. In my experience, most vibration issues trace back to unbalanced feet rather than broken internal parts.
Check the top surface with the level facing front to back, then side to side. The machine should stand stable across both axes, with the feet making full contact with the floor.
These signs point to an uneven appliance:
- Visible rocking when the drum is full
- Scuff marks where the feet have shifted
- Excessive noise that changes when you press down on a corner
Each one of those symptoms raises the odds of vented tumble dryer repair. Leveling the cabinet protects the alignment of every rotating part inside.
Knowing When a Professional Technician Is the Right Call
Most vented tumble dryer repair calls are preventable. A few minutes of routine attention can add years to the machine’s life. I always tell owners to wipe the door seal after every cycle and to check the drum for loose items before loading. Those small habits reduce strain on the motor and bearings.
Preventive care also means watching how you load the drum. Overstuffed loads force the belt to work harder. Underfilled loads let clothes tumble unevenly. Either extreme accelerates wear on the suspension.
There is a boundary where a professional technician is the right call. A fuse box that trips, a persistent burning smell, or a scraping noise that leveling and cleaning cannot fix all indicate failures beyond a DIY fix. Calling a specialist for vented tumble dryer repair protects your warranty and your safety.


0 Comments