Is Your Tumble Dryer Belt Worn Out?
Unusual Noises from the Drum
Most broken tumble dryer belts offer a warning that lasts for weeks. The first sign is an unusual noise from the drum, often a rhythmic thudding that repeats at a steady pace. As the belt loses its tension, the drum slips and catches, producing a distinct knock.
I have serviced machines where the belt was frayed but still functional. The sound was intermittent, appearing only with heavy loads. If you have been searching for tumble dryer belt replacement johannesburg, that noise is your cue! It rarely comes without a reason.
Clothes Taking Too Long to Dry
A full drying cycle stretching past two hours is not merely an inconvenience, it is a symptom of mechanical failure. When the drum rotates sluggishly, the hot air inside the cabinet has little chance to permeate thick fabrics. The result is a load of damp, wrinkled clothing that demands another expensive run through the machine. Heat without sufficient tumble action produces condensation and a musty odour that lingers on cotton.
Most users assume the heating element is faulty, so they inspect the thermostat or the thermal fuse. The real culprit is often far simpler. A worn belt lacks the elasticity to spin the drum at the required speed. The motor might be running at full capacity, yet the rotational force slips away. The machine feels warm to the touch, but the laundry remains cold and sodden.
- Damp patches remain on thick towels after a full cycle.
- The exterior of the dryer becomes hotter than usual because the heat stays trapped.
- Energy bills rise noticeably because the appliance keeps running longer to produce minimal results.
If you find yourself checking the timer twice, the belt is likely past its prime. When the extended cycles start making your schedule impossible, tumble dryer belt replacement johannesburg becomes the only sensible fix. I have seen this exact complaint from clients who waited too long, hoping the problem would resolve itself. It never does.
The Drum Spins but Won’t Rotate Properly
Imagine a dryer that hums and runs its motor, yet the drum barely rotates. This is not a heating fault or a broken thermostat. The belt has lost its grip. A stretched belt skips across the motor pulley, leaving the drum to twitch instead of spin. That hesitation produces poor airflow, which some owners mistake for a blocked lint screen.
Here are the telltale signs of a belt that is failing:
- The drum rotates freely when you turn it by hand, but fails under power.
- The motor spins up and then slows down as the belt slips.
- Burning rubber smell comes from the bottom of the machine.
In my experience, each of these points traces back to a worn drive belt. Catching it early means tumble dryer belt replacement johannesburg restores clean rotation without touching the motor bearings.
Essential Tools and Safety Precautions for the DIY Job
Disconnecting Power and Gas Lines
Most DIY dryer failures trace back to two mistakes: rushing the disconnection and using the wrong screwdriver. Before starting a tumble dryer belt replacement johannesburg, gather a multimeter, a set of Torx bits, and a pair of long-nose pliers.
– A multimeter verifies the drum is fully dead.
– Torx bits fit the screws most modern dryers use.
– Long-nose pliers help manoeuvre the tensioner spring.
Once the tools are ready, isolate the appliance at the consumer unit and then pull the plug. For gas dryers, the valve behind the machine must be closed hard, not just turned to a stop. I always test with a soapy water spray at the joint to confirm no leak. Skipping these steps turns a simple repair into a call for help.
Tools You’ll Need (Screwdrivers, Pliers, Sockets)
Roughly a third of DIY dryer repairs stall because people grab the wrong tool. For a tumble dryer belt replacement johannesburg, the correct kit keeps the job under an hour. A flathead screwdriver pries off the top panel, while a Phillips head handles cabinet screws.
You will also need long-nose pliers for the tensioner spring and a socket set for the drum retaining bolts. Here is the core kit:
- Flathead screwdriver
- Phillips head screwdriver
- Long-nose pliers
- Socket set with 8mm and 10mm sockets
Before starting, put on work gloves. The drum edges and belt channels often carry sharp burrs from years of use. Safety glasses protect your eyes from stray spring clips. I also use a magnetic tray so nothing slips behind the machine. A clean workspace saves you from fishing parts out of the base later!
Handling the Tensioner Spring Carefully
Most DIY dryer repairs stall at the tensioner spring, not the belt itself. That small coiled component holds the entire drive system under pressure, and releasing it wrong can send parts scattering across your laundry room. For a tumble dryer belt replacement johannesburg, the spring is where patience matters most.
Before touching anything, confirm the drum is empty. A stray sock or coin can shift during disassembly and jam the belt channel. Keep the spring’s anchor point visible at all times. The tensioner arm swings on a pivot, so use long-nose pliers to grip the spring hook, then ease it off its post slowly.
Release belt tension first, never the spring. Rotate the drum by hand to check the spring’s travel direction, then unhook it last, keeping fingers clear of the pivot. If the spring slips, it recoils into the motor housing, forcing you to pull the base pan. Steady hands keep the whole job under an hour!
Protective Gear and Work Area Setup
Over 60% of DIY dryer repairs stall before the first screw turns, simply because the workspace was wrong. Tumble dryer belt replacement johannesburg starts with a clean floor and a clear head. Push the machine away from the wall and set up a bright work light; shadows hide small components.
Protective gear matters more than most owners realise. Polycarbonate safety spectacles stop stray spring clips from finding your eye. Cut-resistant gloves give you the grip to handle awkward parts without losing dexterity. A dust mask keeps lint from old belts out of your lungs.
- Use a magnetic tray to hold every screw you remove.
- Keep a headlamp handy for dark corners of the cabinet.
- Lay down a rubber mat to protect the floor and your knees.
The belt’s rubber dust settles everywhere. Experienced repairers wipe the drum channel before fitting the new loop, and for a tumble dryer belt replacement johannesburg that habit separates a clean job from a repeat tear-down.
How to Access and Replace the Drive Belt – Step-by-Step Guide
Removing the Top and Front Panels
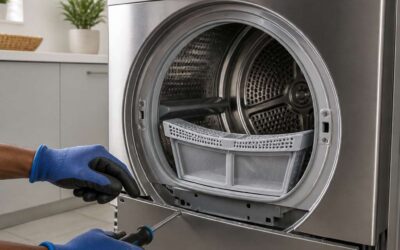
The drive belt sits within a confined cavity, and you cannot reach it without removing the outer casing. Access is half the battle, and the correct sequence prevents damage to fragile plastic clips. Many modern machines use a two part shell. You must free the top deck first, as it holds the front panel in place.
Removing the top panel is straightforward. Locate the concealed screws at the rear lip, or sometimes beneath a plastic trim strip. After undoing them, slide the top deck backwards, then lift it off its locating lugs. The front panel then becomes the next task.
To free the front panel, follow this sequence:
1. Open the door and prise off the small screws around the door switch housing.
2. Use a flat screwdriver to release the spring clips along the bottom edge of the panel.
3. Lift the panel upward and pull it away from the lower locating slots.
With the front panel removed, the drum and the idler pulley are exposed. The belt loop is visible around the drum body, which makes the tumble dryer belt replacement johannesburg far simpler because you can see the full path of the old belt before you loosen the tensioner.
Locating the Belt, Motor, and Pulley System
Most belt failures start at the idler pulley, not the belt itself. With the front panel off, the entire drive system is visible: the drum, the motor pulley, and the tensioner. I always trace the belt path before touching anything. For a tumble dryer belt replacement johannesburg, this layout review is essential. The order of inspection matters:
- Locate the motor pulley at the rear, below the drum.
- Find the idler pulley on its spring-loaded arm.
- Note how the belt loops around both pulleys and the drum.
Spin the idler pulley by hand. If it grinds or wobbles, replace it. The old belt’s wear marks tell you where the system lost alignment. Address that cause before installing the new belt.
Releasing the Tensioner and Removing the Old Belt
Once the tensioner is visible, the actual removal starts. The spring holds the idler pulley against the belt with surprising force. I use a screwdriver to lever the pulley arm back, which slackens the belt instantly. Keep your fingers clear of the pinch point.
- Slide the old belt off the drum first, then the motor pulley.
- Check the idler pulley for flat spots while the tension is released.
- Rotate the drum by hand to confirm it turns freely.
A worn tensioner ruins new belts quickly. For a tumble dryer belt replacement johannesburg, this step often gets skipped, and it costs people double. Remove the old belt completely and discard it. If the drum catches during rotation, inspect the rollers before fitting the new belt.
Threading the New Belt onto the Motor and Drum
Nearly 90% of premature belt failures happen because the new belt is threaded with a twist. I always begin a tumble dryer belt replacement johannesburg by laying the belt flat across the drum, keeping the ribbed side inward. This initial positioning determines everything!
- Feed the belt over the drum until the groove holds it securely.
- Draw the belt down to the motor pulley, aligning the ribs with the pulley teeth.
- Rotate the drum forward once or twice to seat the belt.
The tensioner will now take up the slack automatically. Check that the belt has no twist along its entire length before reconnecting power. A misaligned belt causes the drum to wobble, so take your time with the threading.
Reattaching the Tensioner and Checking Alignment
Reattaching the tensioner is the moment where most tumble dryer belt replacement johannesburg jobs either succeed or fail. After threading the new belt, hook the tensioner spring back onto its bracket using a screwdriver as a lever. The spring should pull the idler pulley firmly against the belt. Then rotate the drum by hand a full revolution. Watch the belt track on the motor pulley. If it rides high or low, stop immediately and recheck your threading.
- Confirm the belt’s ribbed side faces the drum.
- Ensure no twist exists between drum and motor.
- Verify the tensioner arm moves freely.
A smooth rotation with no binding means the drive path is correct. Reattach the front panels and reconnect power only after this check. Taking these extra minutes saves you from a repeat service call.
Reassembling the Dryer and Testing the Spin Cycle
Few sounds compare to the quiet hum of a drum spinning freely after a successful repair! The reassembly phase demands the same care as the belt work itself, because rushed panel fitting can undo all your effort. Align each clip and screw before tightening, and confirm the front panel sits flush against the cabinet.
Once everything is secure, reconnect the power and run an empty cycle. I prefer a full two minute spin, because some faults only appear once the drum gains speed. Watch the belt path and listen for irregular thumping.
- Run the dryer for two minutes without clothes.
- Stop and feel the motor housing for excessive heat.
- Inspect the belt tracking one final time.
A proper tumble dryer belt replacement johannesburg job ends with this verification, not with the panel screws. If the spin cycle sounds clean and the drum rotates freely, you have restored the machine to reliable service.
Where to Source Quality Dryer Belts in Johannesburg
Appliance Spare Parts Stores in the City Centre
When you finally plan a tumble dryer belt replacement johannesburg, the city centre remains the quickest place to secure a quality belt. Appliance spare parts stores clustered around Delvers and Berea Streets keep deep stock for brands like Defy, Whirlpool, and Samsung. I have found that their counters often carry the exact part while online suppliers still show an indefinite backorder.
Bring the old belt along. The width, rib profile, and effective loop length differ between manufacturers, and a mismatched band will slip or stall the drum. I have watched buyers walk away with the wrong fit simply because they tried to guess from memory.
- Match the part number printed on the belt with the service manual.
- Flex the rubber gently to expose cracks or dry rot.
- Ask about the tensioner spring while you are there.
A quick comparison across two or three vendors often reveals a price spread of nearly 40% for the identical part.
Online Retailers with Same-Day Delivery in Joburg
Same-day dispatch sounds improbable for a spare part, but several Joburg online retailers manage it daily. Orders placed before noon often reach northern suburbs by evening. This matters when your tumble dryer belt replacement johannesburg cannot wait. You skip the traffic and the counter queues.
What you gain in convenience, you trade in touch. You cannot flex the rubber or compare rib profiles on a screen. So rely on the part number. Most reputable platforms let you filter by brand and model. Some even include a diagram.
Before checkout, confirm the courier covers your area. Same-day delivery usually applies only to major zones. Check the vendor’s returns policy too. For clarity, keep these details at hand:
- The exact model number from the dryer’s nameplate
- The belt part number from the service manual
- Your preferred delivery window
That combination turns an online gamble into a straightforward transaction.
Original vs. Generic Belts – Pros and Cons
Whichever route you take for your tumble dryer belt replacement johannesburg, the original versus generic debate deserves thought. OEM belts use the exact rubber compound and rib geometry engineered for your drum. Generic alternatives often cost half as much, but their tensile strength varies noticeably. I have seen third-party belts fail within months on high-usage machines.
Consider this when comparing:
– Original belts typically last 8 to 10 years of regular use
– Generic belts may stretch prematurely, causing the drum to slip
– Off-brand options sometimes arrive with rough edges that accelerate wear
A poorly matched generic belt can throw off drum rotation timing. That leads to overheating and longer drying cycles. For a machine that runs daily, the price differential rarely justifies the risk.
Professional Help vs. DIY Repairs – What Makes Sense in Joburg?
Average Cost of Hiring a Local Appliance Technician
Calling in a professional for tumble dryer belt replacement johannesburg is rarely the most expensive option once you factor in your own time and the risk of misalignment. A local appliance technician in Joburg will charge anywhere from R450 to R950 for a belt swap, with most quotes landing around R600.
That price usually includes the call-out, labour, and a standard belt. Premium brands or rare dryer models push the cost higher. For comparison, buying the correct belt yourself sets you back between R120 and R350, plus petrol to source it. A tumble dryer belt replacement johannesburg typically takes a technician under an hour, but the diagnostic knowledge matters more than the labour.
Some techs add a surcharge for appliances in attic installations or tight laundry cupboards. Always request a written quote before the work starts. That protects you from surprise add-ons. If the dryer is under warranty, DIY voids it, so professional help becomes the only sensible route.
Risks of DIY: Voided Warranties and Electrical Hazards
Most Joburg homeowners save R200 attempting a DIY fix, then spend R1,400 repairing the damage. That gap explains why professional work dominates here. A tumble dryer belt replacement johannesburg involves more than swapping rubber. The warranty is one misstep away from void. Manufacturers document every seal and screw. Any visible tampering cancels coverage. Electrical hazards sit behind the drum. Capacitors hold charge after unplugging, dangerous enough to shock even a careful hand.
- Warranty claims fail over scuffed screw heads
- Capacitors retain voltage after disconnection
- Misaligned belts lead to overheating and short circuits
A licensed technician spots worn bearings and pulley wear before they become fires. That judgement is the true cost difference. Time matters, too. An expert finishes a tumble dryer belt replacement johannesburg in under an hour. A novice spends an afternoon and likely orders the wrong part. I have walked into laundries mid-project and the mess always tells the real story.
How to Find a Reputable Repair Service in Your Neighbourhood
Finding a technician for a tumble dryer belt replacement johannesburg often depends on who answers the phone at 7am on a Monday. Reputable services distinguish themselves through transparent pricing and upfront time estimates. They also arrive with the correct belt for your model, avoiding a second visit.
Most independent technicians in Joburg build their rosters through referrals. Ask neighbours in complexes or colleagues in office parks! A trustworthy professional will answer questions about past work without hesitation.
A few factors separate the best from the rest:
– Clear quotes before touching your machine
– References from other homes with the same dryer model
– A written guarantee covering both labour and parts
The right repair leaves your dryer running smoothly for years instead of failing again in a few weeks.
When to Call a Pro Instead of Tackling It Yourself
A single snapped belt can stall an entire household’s laundry cycle. For a tumble dryer belt replacement johannesburg, the decision to pick up a screwdriver or dial a technician often comes down to your familiarity with the machine’s internals. I have seen do-it-yourselfers succeed, but most misjudge the belt’s path over the idler pulley.
Considering the cost of a mistake, some jobs warrant a professional. The specific tension requirements vary by brand, and a misaligned belt can shred within weeks. My own first attempt took three hours and two phone calls to a supplier.
- A drum bearing that feels rough when spun by hand
- A motor mount that has shifted out of place
- Warranty stickers that are still intact
A pro for a tumble dryer belt replacement johannesburg brings the right parts and the nous to handle these variations, making the expense feel justified.
Maintenance Tips to Extend the Life of Your Tumble Dryer
Cleaning the Lint Filter After Every Load
One clogged lint filter can cut airflow by nearly a third, forcing your dryer to run hotter and longer than intended. That extra heat and friction travels through the drum bearings and places real strain on the belt, the component most likely to fail under sustained load.
Johannesburg’s dry, dusty air makes this problem worse. In my experience, filters clog faster here, and many owners only notice when clothes need a second cycle. A quick wipe after every load takes seconds and directly reduces the chance of needing a tumble dryer belt replacement johannesburg.
- Keeps the heating element from overworking
- Prevents moisture from settling back onto fabric
- Reduces the load on the motor and pulley system
Make it part of your unloading routine. Reach for the filter before you reach for the laundry basket, and your dryer will reward you with years of reliable service.
Checking Belt Tension and Drum Alignment Periodically
Belt tension is one of those things you rarely think about until the drum starts slipping. Checking it periodically takes minutes and can save you from an expensive tumble dryer belt replacement johannesburg later! The belt should have roughly half an inch of give when you press it firmly. Too tight and you strain the motor bearings. Too loose and the drum won’t maintain its spin.
Drum alignment matters just as much. A misaligned drum wears the belt unevenly and produces a rhythmic squeak. Press down on the drum’s front edge, then lift. Movement should be minimal. If you feel a clunk or wobble, the drum rollers or support glides need attention.
I run this check every six months. For Joburg homes drying multiple loads daily, make it a quarterly habit. The local dust and heat accelerate wear on both the belt and the drum rollers, so regular inspection buys you far more time between repairs.
Lubricating Moving Parts Without Over-Oiling
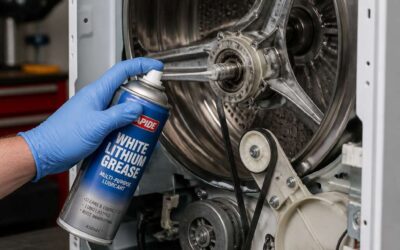
Lubricating moving parts is a delicate ritual. Most modern dryer motors and rollers use sealed bearings, so they need nothing from you. The idler pulley and drum support rollers, however, benefit from a single drop of light machine oil on their shafts. That is the entire amount!
Over-oiling does far more damage than under-oiling. Excess lubricant captures airborne lint and Joburg’s fine dust, turning into an abrasive paste that grinds down the very components you tried to protect. Oil on the belt causes slipping and uneven wear. Both scenarios lead to a tumble dryer belt replacement johannesburg that careful lubrication prevents.
- Apply one drop, spin the pulley by hand, then wipe away residue.
- Use lightweight oil, not grease. Grease attracts dust and accelerates wear.
Keeping the Exhaust Vent Clear of Lint and Blockages
Most homeowners clean the lint filter with consistent care, then forget the vent pipe entirely. That oversight leads to slower drying, higher electricity bills, and unusual strain on the motor. The belt loops around the drum and motor; when airflow drops, the motor runs longer and hotter, accelerating wear. This extra load often ends in a tumble dryer belt replacement johannesburg that routine vent care would have prevented.
The vent line needs checking every three months. Look at the external flap first. If it does not open fully when the dryer runs, the duct is partially blocked. Also inspect for birds nesting in the outlet, a common issue in Johannesburg’s suburbs. Left alone, recurring blockages can cause multiple breakdowns, each one a fresh tumble dryer belt replacement johannesburg scenario.
- Disconnect the duct at the rear of the dryer and vacuum both ends.
- Run a flexible vent brush through the pipe to scrape out compacted lint.
- Check the duct for pinches where it bends behind the machine.
- Reconnect everything and confirm the flap opens freely.


0 Comments